How to Use a GPS Map App (OruxMaps) on Android for free!
By MarkR - Last updated: Jan-2016

Many smart-phones and tablets now have considerable processing power, useful screen sizes and embedded GPS receivers. It seemed the right time to explore the possibility of using the smart-phone or tablet as a cheap GPS device for guiding or recording walks.
If you have an Android device with a GPS receiver or are thinking about getting one, then this article might be of interest to you.
Before searching for a solution, a wish-list of features was made:
- Should be easily affordable.
- Should function correctly without a data or phone connection.
- Should use vector maps to reduce the space required for map storage.
- Must be possible to overlay a prepared walking route on the maps.
- Should support both KML and GPX formats.
As it happens, all of these wishes are easily met and this page describes one solution for Android devices. Most likely the same can be achieved for Apple's iOS but that is outside the scope of this article.
Installing Software and Data
There are five steps involved to make your Android device ready to use for GPS mapping:
- Install a mapping application on your device
- Install maps on your device
- Install a style for the maps (e.g. highlight footpaths and contours)
- Install walking routes
- Configure the app to your liking
Selecting and Installing a Mapping Application
Most Android devices come with Google Maps pre-installed. Although you could use this, its usefulness for walking outside cities is limited as Google's maps currently lack most of the countryside footpaths that are used by walkers.
In order to see such paths it is necessary to have an application that is capable of displaying maps that contain these paths. There are many available on the Google Play store, including several very good ones.
Of the apps evaluated, 3 stand out:
| Google Play / iTunes | Web Site | Opensource | Cost | Devices | Developers | Updates |
|---|---|---|---|---|---|---|
| OruxMaps | oruxmaps.com | Propriatory | Free or £3.89 | Android only | European | Regularly updated. |
| Locus | locusmap.eu | Commercial | Free with ads or £6 | Android only | European | Regularly updated. |
| MAPS.ME | maps.me | Opensource | Free | Android, iPhones and Amazon Fire | American | Regularly updated |
These apps do much more than just satisfy the initial criteria. You could try browsing their web sites to get a feel for their varying functionality however they are quite complex and configurable so you won't really know until you try them for yourself. All these apps have a "free" version:
- OruxMaps: "Free" and "Donate" versions are the same - neither has advertisements.
- Locus: "Free" version has advertisements. "Pro" version has more features.
For simplicity, this article describes only OruxMaps.
1) Install the App
This is quite easy. Locate OruxMaps in the Play Store and install it.
2) Installing Maps
Traditionally, walkers in the UK have used maps produced by Ordnance Survey with the 1:25000 "Explorer" maps being particularly useful. There are copyright issues with using these maps that means they are no longer available to mapping apps such as OruxMaps (as of mid 2013). A variety of other maps are accessible by OruxMaps including both online and offline maps.
Online maps require a data connection to retrieve map "tiles" on-the-fly over the internet. This can be unsuitable if you are walking in an area with no signal, or if data is expensive to retrieve (e.g. if you are roaming). Although you can overcome this to some extent by pre-loading the maps, offline maps are recommended.
Offline maps are maps that have been loaded onto your device before venturing outdoors. You need only load maps for an entire country once and then forget about it (although you might update it once or twice each year).
A good source of free maps is the OpenStreetMap project. These maps are crowd-sourced and although they do not currently include all footpaths more are being added on a regular basis. In some places, they are now betteraand more accurate than OS maps.
There are some web-sites that take the OpenStreetMap data and enhance it in some way. One such site that is a good source for maps is OpenAndroMaps.
After checking you have enough space, download the free maps. Best to do over a free WiFi connection.
- use your device's browser to navigate to http://www.openandromaps.org/en/downloads/europe
- click on the + next to Great Britain
- click install on Oruxmaps
This will take a while to download and install. Update are in the 'notifications' list.
3) Installing a Rendering Style / Theme
The map file that was installed in the previous step contains information about roads, footpaths etc. but does not specify how to display them (e.g. colour, size, or at what zoom levels they should be visible). OruxMaps allows for rendering themes to be installed and to switch between them.
The default theme is not specialised for walkers, so its best to install a new one
- Using your devices browser, navigate to http://www.openandromaps.org/en/legend/elevate-mountain-hike-theme
- Do NOT install Elevate 3 - its for a beta version only, thats not available in the Google Play Store
- Install Elevate 2. Click on Install in Android / Orux Maps
Another theme is Voluntary UK which looks a bit like an OS Landranger map. You'll have to download it manually, though, on to your PC. Scroll dwon that page and look for Voluntary_Atlas.zip. Download, then unzip it. Then drag and drop the folder on to your Android device (connect it with the USB cable) into the mapstyles folder
3) Installing Walk Routes
Walk routes are usually encoded in either GPX or KML format (or KMZ, which is compressed KML). These files are basically just a list of co-ordinates plus a few Points of Interest.
Most SWC walks now have both GPX and KML files available on the individual walk pages. Click on the "GPS Route" button near the top of the page - this shows another page that has buttons for GPX and KML files. There are also many web sites that contain walk routes in these formats, useful for example if planning to walk in other countries.
These files can be placed on the Android device in the directory .../oruxmaps/tracklogs - you might want to create sub-directories of this directory to make the route files easier to find (e.g. by country or region).
OruxMaps currently (version 5.5.14) displays the GPX routes with a pin-like icon at each point on the route, which clutters the screen. As such, you will probably prefer the KML version of the route, which does not have from this problem.
4) Tailor OruxMaps Configuration
There are some configuration options that can be used to make OruxMaps de-clutter the screen - useful on devices with limited screen space. Once you have become familiar with the app you might like to change some things. Here are some to consider.
To access the configuration use the Android menu button and select Settings.
- User interface:
- Buttons:
- Hide buttons: Yes
This will hide the buttons on the left and right sides of the screens and replace them with a small blue square that can be touched to have the buttons reappear.
- Hide buttons: Yes
- Dashboard:
- Hide dashboard:Yes
This will hide the dashboard at the bottom of the screen in the same manner as the buttons above.
- Hide dashboard:Yes
- Tracks:
- Letter size: 30
Increase the size of way-point names - so no need to use reading glasses.
- Letter size: 30
- Miscellaneous UI:
- Status Bar: Hide
Remove the Android status bar to make more room for the map. - Circle GPS precision: Yes
Draw a circle around the GPS location to show how imprecise it is. - Scale: Yes
Draw a distance scale at the bottom left corner.
- Status Bar: Hide
- Buttons:
- Waypoints:
- No icons: Yes
This option may be useful if you are loading routes from GPX files. These files cause each way-point and change of direction to be marked with an icon, which can clutter the screen (KML files do not have this problem). Select this to mark way-points with a dot rather than the icon. The way-point name is still displayed though, so this is not the best solution.
- No icons: Yes
Running OruxMaps
Now that everything is installed you will want to become familiar with OruxMaps. This document gives a quick guide to starting OruxMaps. For more information refer to the manual.
Firstly, turn on the GPS receiver in your device.
Next start OruxMaps.
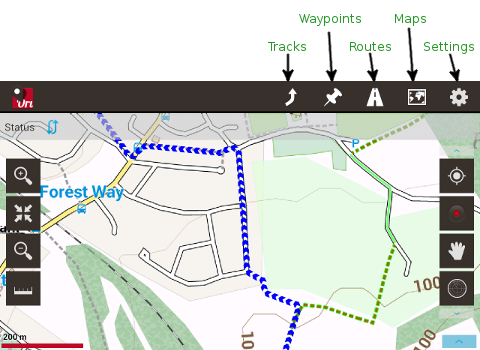
Screenshot of OruxMaps

Refer to the annotated screen snapshot above. Across the top of the screen, towards the right, there are some buttons.
- Press the button labelled Maps then select Switch map This will show a screen with two tabs - select Offline
- You should see the map (e.g. Great_Britain) that you copied to the device earlier. Select it
- If you now see just a white square in the middle of the screen, this is because the zoom level is out too far (some maps are only visible for a selected zoom range).
- Try zooming in a few times (two fingers on the screen and move them apart).
- OruxMaps remembers the map selection so you only need to repeat this to use a new map (e.g. if you've changed country).
Next select a rendering mode.
- To do this touch the Android menu button and select Tweaks then Mapsforge style.
- This should show you any rendering themes you installed earlier.
- If you use a separate directory for each theme (a good idea) then select the theme directory (e.g. ELV) then select the XML file (e.g. Elevate.xml).
- The map now re-renders with the selected theme. This theme will be remembered over restarts of OruxMaps.
If you are planning to follow one of the routes you have loaded onto the device, you should now load that route onto the screen.
- To do this press the "Routes" button and select Load file
- This will show the contents of the directory where you placed the GPX or KML files. Navigate any sub-directories and select the route you wish to walk.
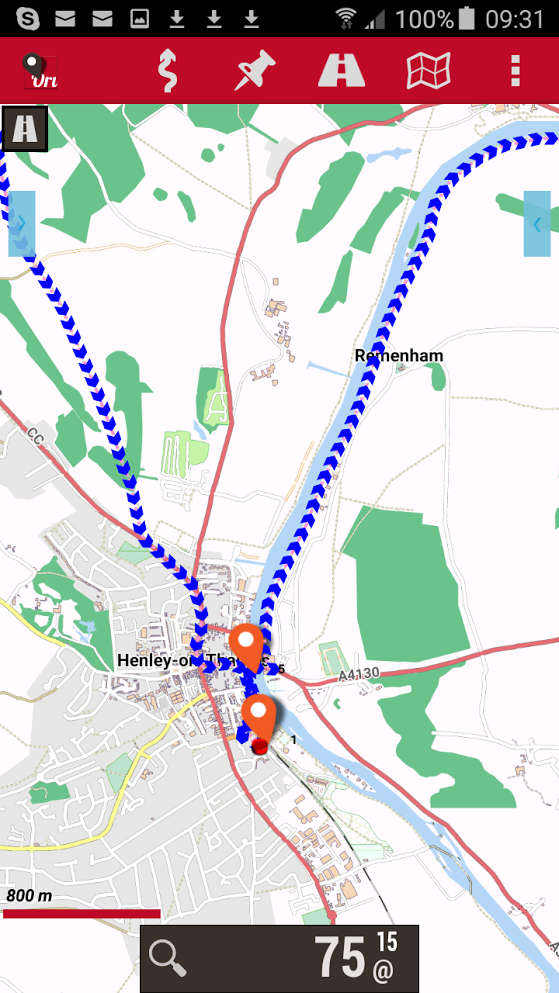
- You should now see a blue line consisting of small chevron-like arrows that indicate the route (see screen snapshot).
- Unfortunately, although you can change the colour of the route line, OruxMaps does not preserve the colours encoded in the KML file so where route variations are shown in different colours this information is lost.
Turn on the GPS tracking function of OruxMaps.
- This is done by the top button of those arranged vertically on the right side of the screen.
- When OruxMaps has a GPS fix, you will see a red arrow-head on the screen. This indicates your current position, and if you are moving the arrow points in the direction of travel.
- A blue circle surrounding the red arrow indicates the possible error in the GPS location.
Optionally, you might also want to start recording the track as you walk.
- This is done by the second button of those on the right.
- Subsequent presses alternate between pausing and continuing recording.
You can now start your walk.
- If the red arrow-head strays too far from the blue line then either you are off the route or the route was incorrectly recorded.
There are many more functions that can be performed with this app - refer to the manual for more information.